
I’ve been making music for close to ten years now, and while I’m still learning new techniques every day I have picked up a couple of tips that help me when mixing and mastering my songs. This first post is about compressors and what the different settings mean in your DAW, and how using them can help or destroy your songs.
I am most versed in the writing and recording aspect of music, but I also do a lot of mixing for my own songs, and using a good compressor on my recorded vocals has helped tremendously when it comes to increasing the quality of my sounds and the overall texture of my recordings. Keep in mind that the information here is just to give you an idea of how a compressor works and is not meant to be taken as the end all be all of how you should use a compressor, just my personal opinions on the subject.
Most compressors will have 6 settings, which are; threshold, ratio, gain, knee, attack, and release. Let’s go into what each one does.
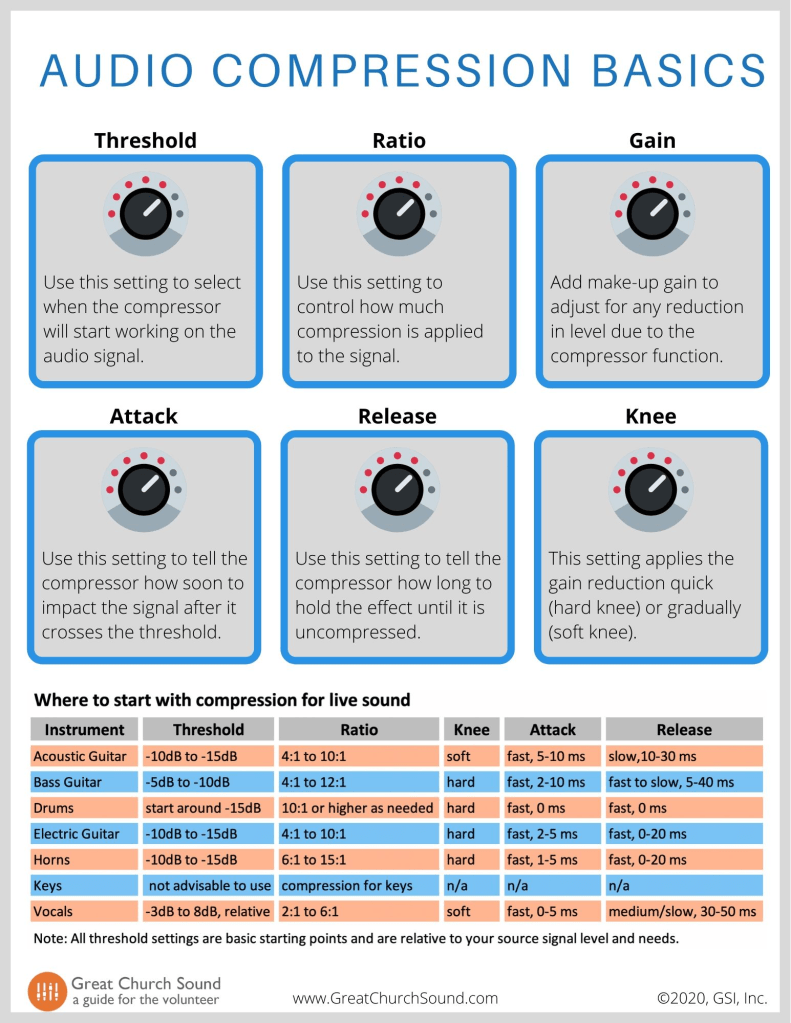
Threshold means the lowest decibels it will compress or the lower volume it will compress. A low threshold only compresses the loudest sounds in your recording, while a super high threshold will compress all of your recordings. You want to find the balance between compressing the highs and raising the quieter sounds. Keep in mind that the threshold does not actually raise the sound, but lowers everything that goes above the threshold line. Mess around with your threshold, so it only compresses the peaks of your voice and maybe a tiny bit of the overall sound of your recording.
The ratio is where you determine how much compression you are going to apply to a signal that goes over your threshold. For every signal that goes over the threshold, it gets compressed according to a certain ratio. This means that a high ratio will lower the sound of the audio going over the threshold very noticeably. If you crank up the ratio your recording will sound sort of muted because you’re cutting away a lot of the audio that normally stands out on a recording. Aim for a slight cut of the peaks without clearing them altogether.
Gain is the actual amount it will compress it. If it’s negative, it’s actually reducing the volume not upping it. The gain is the tool that actually raises or lowers the sound of your recording. It is customary to make up the sound you reduced with the threshold and the ratio with the gain. What you are essentially doing when you use a compressor is creating a wavelength that is more uniform in terms of volume than something raw that would come directly from your recording device. Take a look at the image below:
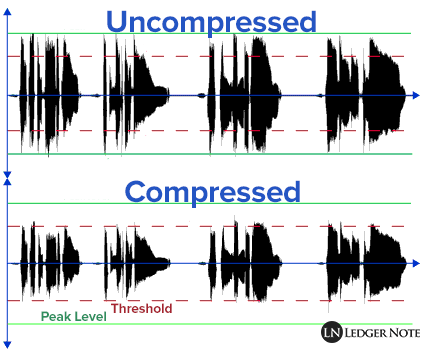
At the top of the image we see the raw audio that came from the microphone, and below we see the compressed audio. In the compressed audio, we can see that most of the audio is actually pretty uniform, the quiet sounds are closer in volume (or height if we look at the image) to the louder sounds, creating a wavelength that is neither too loud nor too quiet, but rather sitting right in the middle. This is perfect for pretty much all sorts of recordings, not just vocals but a good compression technique could do wonders on guitars, drums, basses, flutes, and pretty much anything. Imagine listening to a song that has ear-splitting vocals one second and the next it’s super quiet, it would be horrible. The quiet sounds would make you focus on the sound more, and then the next second the ear-splitting sounds would break your eardrum and scare you. Like an audio jump scare. Sure though if that’s what you are aiming for then forget about compression, but if you’re not making a horror game then your recordings should have some sort of compression.
The attack is how fast your compressor will be activated. You can lower it for your song or raise it depending on the speed of your song and the audio that is being compressed. A fast attack will “clamp” or lower the sound immediately after the compressor catches that the audio is going over the threshold, while a slow attack will take a little more time to compress the audio, giving a smoother (not necessarily better) compression. In my opinion, you want to tune your attack and release (which we’ll talk about soon) to the genre of music you are making. If for example you are making fast raps with hardly any melodies but mostly spitting, then you want that attack at a fairly fast rate so it’s catching each syllable of the verse. Whereas if you’re making something like opera, then your attack should be slower so that your singer can get to their loudest notes and back without making too much of a transition but still compressing the audio enough so it doesn’t peak.
Release means for how long your compressor will stay on. A fast release means that the compressor will stop as soon as the audio stops, which as we mentioned is great for fast raps and a short burst of consecutive sounds. While a long release time means the compressor will take more time to turn off, which is great for melodic sounds that tend to change notes but not necessarily volume. Imagine for a second how it would sound to put a fast attack and release on audio with long breathy melodic noises, it will sound like it’s undulating because instead of staying in one range of volume it is quickly changing from low to high and high to low. Everything in music is subjective and if this sort of effect is something you are looking for then go for it, but always make considerate, and cohesive decisions on your tracks. If there’s no rhyme or reason to the decisions you are making then your mix will suffer because of it. Be deliberate with the type of compression you use and you can elevate your sound to the next level.
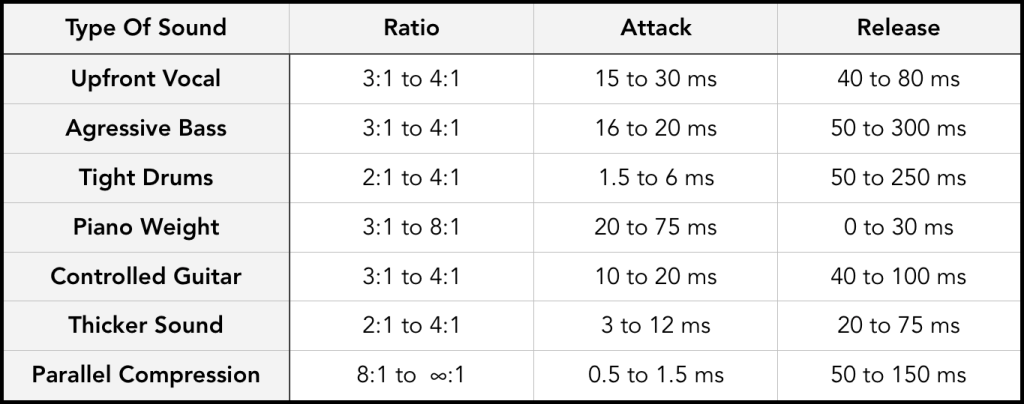
Here are a couple of different ratios to help you determine what might sound best for your recording:
3:1 is considered moderate compression.
5:1 would be considered medium compression.
8:1 is considered strong compression
20:1 thru ∞:1 (infinity to one) would be considered “hard limiting” — making it so the audio never exceeds the set threshold.
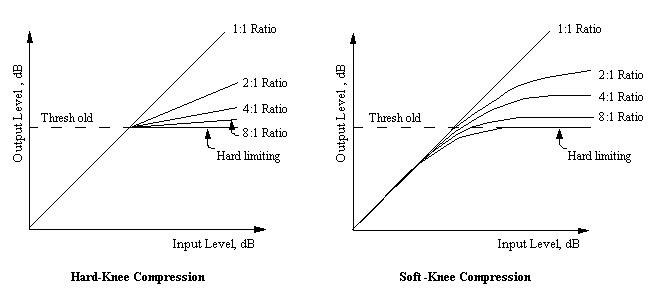
The knee is where the compressor starts to bend. Literally, think of your compressor as a leg, and wherever you set the knee is where the threshold will bend and start compressing the audio.
Some compressors give you a distortion setting that gives you different types of compressor distortion, soft is more laid back, while a hard type would be great for screamo-type sound where you want it to sound like it’s peaking but not really.
A “brick wall” compressor is called a “clipper”, and can also be called “hard limiting”, literally just flattens any wave which peaks above your threshold, this would be the 20:1 ratio (and up to infinity), use that to get loud music. Brickwall limiters are great for making something sound louder, perfect for the mastering stage where you have the full track in one needed audio file and you want the whole thing to sound louder, add a brick wall on there and the whole thing will turn up in volume while keeping the peaks the same. Keep in mind that all compression reduces the dynamic range, and whilst that is a good thing in most cases because you don’t want too much dynamic range, you still want a bit of it because a totally balanced and equal recording will get boring fast.
When you’re adding your brick wall compressor to your master, keep this handy dandy tip in mind. Very loud with dubstep, a little less loud with trap or grime, and very little with ambient or lo-fi.
I think that covers all the information on compressors that I have to share at the moment. If you have any other tool you’d like me to go in-depth with let me know down in the comments section and I will do my best to explain what they do and how to best use them for your next song. If I got anything wrong do let me know and I will do my best to fix it. I am by no means a master of mixing so I’m always happy to learn more and revise my concepts in hopes of making my sound that much better.
Take care and keep on making music!
